Mint care tips
Understanding the Foundation: Soil and Site Selection
The success of your mint plant begins long before a single leaf unfurls. It starts with the fundamental decisions of soil and location. I recommend paying close attention to these initial steps, as they will dictate the plant's health and vitality for seasons to come.
The Perfect Soil: A Detailed Examination
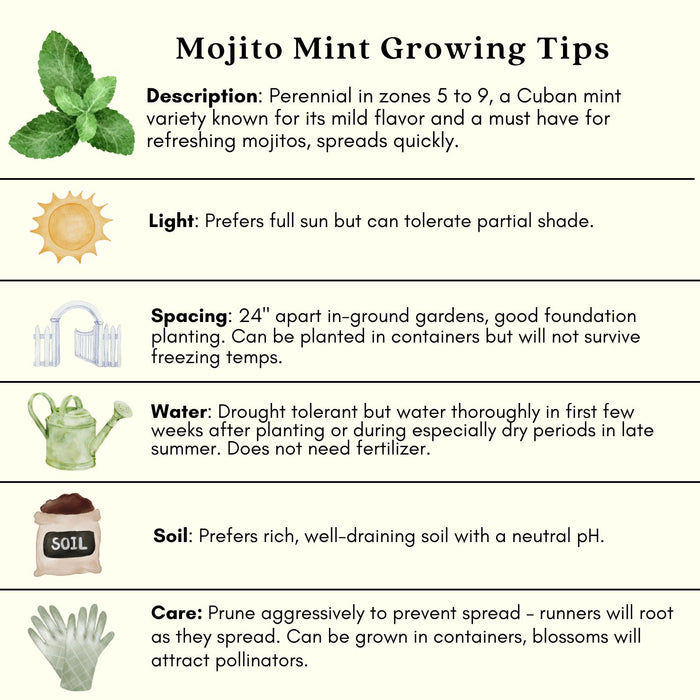
Mint is not overly demanding, but to achieve truly exceptional growth, we must provide it with a moist, welldraining, and nutrientrich soil. While it can tolerate a wide range of soil conditions, a sandy loam enriched with a generous amount of compost or other organic matter is the ideal medium.
For container gardening, we recommend a highquality, allpurpose potting mix. Look for a mix that is specifically designed for container plants and contains a good balance of compost, peat moss, and perlite or vermiculite. This combination ensures excellent drainage while retaining the necessary moisture that mint craves. We also find that adding a handful of slowrelease organic fertilizer at the time of planting provides a consistent supply of nutrients, promoting lush, continuous growth.
For inground planting, we advocate for amending the native soil. Dig a hole twice as wide as the root ball and mix the excavated soil with a 50/50 blend of wellaged compost. This will improve soil structure, increase water retention, and provide a rich supply of micronutrients. Mint prefers a soil pH of 6.0 to 7.0, which is slightly acidic to neutral. Most garden soils fall within this range, but a simple soil test kit can provide certainty.
Location, Location, Location: Sun and Shade Dynamics
Mint is a versatile plant when it comes to light exposure, thriving in both full sun and partial shade. However, from our experience, the perfect balance is a location that receives 46 hours of direct sunlight per day, preferably in the morning.

In hotter climates, we strongly recommend planting mint in a spot that receives afternoon shade. The intense heat of a summer afternoon can cause the leaves to scorch and the plant to wilt, even with ample watering. Providing some shelter during the hottest part of the day will protect the delicate foliage and maintain the plant's vigor.
Indoor cultivation presents its own set of challenges and opportunities. For a bountiful indoor plant, we recommend a south or westfacing window, where the mint can soak up as much bright, indirect light as possible. If natural light is limited, a grow light can be an excellent supplement, ensuring your plant receives the energy it needs for robust growth.
The Art of Watering and Fertilizing: Precision for Peak Performance
Mint's success is intricately tied to a consistent supply of water and nutrients. While it is a relatively forgiving plant, a thoughtful approach to watering and fertilization will lead to a more productive and flavorful harvest.
Watering: The Key to Consistent Growth
We find that mint prefers to have its roots in a consistently moist, but not waterlogged, environment. Overwatering can lead to dreaded root rot, a fungal disease that can quickly kill a plant. Conversely, letting the soil dry out completely will cause the leaves to wilt and turn yellow, stunting growth and diminishing flavor.
For container plants, we recommend checking the soil moisture daily, especially during warm weather. A simple finger test is the most reliable method: insert your finger an inch into the soil. If it feels dry, it's time to water. Water until you see water draining from the bottom of the pot, ensuring the entire root ball is saturated.
For inground plants, we suggest a less frequent but more thorough watering schedule. A deep soak every few days is far more beneficial than a daily sprinkle. This encourages the roots to grow deeper, making the plant more resilient to dry spells.
Fertilizing: Nourishing Your Plant to Perfection
Mint is a surprisingly heavy feeder, especially if you are harvesting frequently. To maintain the lush, deep green foliage, we recommend a regular, yet moderate, feeding schedule.
For container plants, a diluted, balanced liquid fertilizer applied every 46 weeks during the growing season (spring through fall) works wonders. We prefer a liquid fertilizer for its immediate availability to the plant's roots.
For inground plants, a topdressing of compost or a balanced, slowrelease granular fertilizer in the spring is often sufficient. We also find that liquid seaweed or fish emulsion can be used as a foliar spray to provide a quick boost of micronutrients, promoting vibrant color and robust growth.
Strategic Pruning and Harvesting: The Path to Productivity
One of the most crucial aspects of mint care is regular pruning and harvesting. This practice is not just about collecting leaves for your kitchen; it is the primary method for controlling the plant's size and encouraging new, vigorous growth.
The Best Time to Harvest
The flavor and aroma of mint are most concentrated just before the plant begins to flower. We recommend harvesting in the morning, after the dew has dried, when the essential oils are at their peak.
The Art of the Cut
To harvest, we do not simply pluck a few leaves. Instead, we cut entire stems down to just above a leaf node. This strategic cut encourages the plant to branch out, resulting in a bushier, more compact form and a greater overall yield. We find that regularly pinching back the top growth of new shoots also keeps the plant from becoming leggy and promotes a dense, full appearance.

The PostHarvest Pruning
After a heavy harvest or as the plant begins to look tired, we advocate for a more aggressive cut. Shearing the plant down to a few inches above the soil line in midsummer will force it to produce a new flush of growth. This rejuvenates the plant, ensuring a fresh supply of tender, flavorful leaves for the rest of the season.
Propagation: The Secret to an Endless Supply
From our experience, one of the most remarkable things about mint is its incredible ease of propagation. It is a plant that wants to be shared, and we find that propagating new plants is an incredibly rewarding and simple process.
The Water Propagation Method
This is the method we recommend most for its simplicity and high success rate.

Select a healthy cutting: Choose a 46 inch stem from a mature mint plant. The ideal cutting is a fresh, nonflowering stem with several sets of leaves.
Prepare the cutting: Remove the leaves from the bottom 23 inches of the stem. This is where the new roots will emerge.
Place in water: Place the prepared cutting in a glass or jar filled with clean water. Ensure that no leaves are submerged, as this can cause them to rot.
Wait for roots: Place the container in a warm, bright spot out of direct sunlight. Within one to two weeks, you will see a network of fine white roots forming along the submerged stem.
Pot up: Once the roots are at least an inch long, gently transplant the cutting into a small pot filled with moist potting mix. Keep the soil consistently moist for the first few weeks as the new plant establishes itself.
Defending Your Mint: Pests and Diseases
Even the hardiest of plants can fall prey to pests and diseases. We believe that an ounce of prevention is worth a pound of cure, and we recommend a proactive approach to protecting your mint.
Common Pests and Our Solutions
Aphids and Spider Mites: These tiny insects feed on the plant's sap, causing the leaves to yellow and curl. We find that a strong spray of water from a hose can dislodge them. For more persistent infestations, a homemade insecticidal soap solution (a few drops of mild dish soap in a spray bottle of water) can be very effective. We apply this to the undersides of the leaves every few days until the problem is resolved.
Mint Root Borers and Caterpillars: These larvae can cause significant damage to the roots and foliage. We advocate for manual removal when possible and, for larger infestations, the use of a safe, organic insecticide like neem oil.
Common Diseases and Our Solutions
Powdery Mildew: This fungal disease appears as a white, powdery coating on the leaves and is a sign of poor air circulation and high humidity. We recommend proper plant spacing and, for indoor plants, providing adequate ventilation. Pruning back affected leaves and stems can also help, as can a spray of a solution of baking soda (one tablespoon per gallon of water).
Rust: This fungus causes orange, rustcolored pustules on the underside of the leaves. We find that the best course of action is to immediately remove and destroy all affected parts of the plant and avoid overhead watering.
Mint's Invasive Nature: The Importance of Containment
We cannot overstate the importance of containing your mint plant. Its aggressive underground runners, or rhizomes, will quickly spread and overtake a garden bed, choking out other plants.
The Container Method
This is our most strongly recommended method for growing mint. A large pot, at least 12 inches in diameter, is the perfect way to control mint's spread. Choose a pot with excellent drainage and consider elevating it to prevent roots from escaping through the drainage holes and into the ground.
The InGround Barrier Method
If you must plant mint in the ground, we recommend using a physical barrier. A bottomless bucket or a large pot with the bottom cut out, sunk into the ground, works well. Ensure the rim of the pot is a few inches above the soil line to prevent the runners from escaping over the top.
Beyond the Basics: Advanced Mint Cultivation and Usage
We believe that once you have mastered the fundamentals, the world of mint cultivation opens up to a new level of enjoyment and expertise.
Companion Planting with Mint

Mint's strong aroma acts as a natural pest deterrent, making it an excellent companion plant for certain vegetables. We find that planting mint in containers near brassicas (cabbage, broccoli, cauliflower) helps to repel cabbage moths and flea beetles. It also works well near tomatoes, helping to deter the dreaded tomato hornworm.
Drying and Storing Mint
For a yearround supply of mint, we recommend drying the leaves. Tie small bundles of stems together and hang them in a cool, dry, and wellventilated location out of direct sunlight. Once the leaves are brittle, strip them from the stems and store them in an airtight container.
Culinary and Medicinal Applications
From our experience, the joy of growing mint is surpassed only by the pleasure of using it. I do not just use it for mojitos and sauces. We recommend using fresh mint in salads, teas, and desserts. The leaves can also be frozen in ice cubes for a refreshing addition to drinks. Medicinally, mint tea is a classic remedy for an upset stomach and can be used to alleviate headaches.
Conclusion: A Green Thumb's Best Friend
In conclusion, mint is not just a plant; it is a testament to the rewards of attentive gardening. With the right soil, a mindful watering schedule, and a consistent approach to pruning and containment, we can all enjoy the benefits of this remarkably generous herb. I do believe that every gardener, regardless of skill level, can and should grow mint. It is a plant that not only survives, but thrives, in the right hands, and in doing so, provides a source of endless delight, fragrance, and flavor. We recommend you begin your mint journey today, and we are confident that you will find it to be one of the most rewarding and fruitful experiences in your garden.
Comments
Post a Comment